Boost Control Overview
The Pro-M EFI PCM can control the boost level in both Turbocharged and Supercharged applications.
Boost control offers several benefits. The most obvious one being the ability to raise the boost level without having to change the wastegate spring. You also have the ability to control the boost pressure at any given time based on several options. The benefit here being the ability to ramp up the boost to keep the tires stuck to the pavement and to minimize abuse to the drivetrain, while improving acceleration. You can even dictate how much boost you want based on the ethanol content of your fuel. In a supercharged application, you can run a bigger blower, or a smaller pulley, and bring on the boost faster than normal, but not run more total boost if you don’t want to. The result is a faster and flatter boost curve.
The Pro-M EFI system has the ability to control boost based on:
- Throttle position and RPM
- Throttle position and RPM for each individual gear. This will work with both automatic and manual transmissions.
- Time since launch - Activated by the 2 step rev limiter.
- Time in each gear. This works with both automatic and manual transmissions.
- Ethanol content of the fuel.
- Any combination of the above.
Additionally, there are several safety features which will help to protect your engine.
All of these features are wrapped up in closed loop control and OBD II diagnostics.
The ability to ramp your boost pressure at a rate that puts your tires at the limit of adhesion, along with the ability to increase your boost pressure well beyond your wastegate's spring pressure, allows you to make your vehicle as fast as is physically possible. Combine this with our traction control system and not only will it be as fast as possible, but it will also be under control, making it a pleasure to drive. Fast, safe and fun. It doesn't get any better than that!
To truly appreciate just how good the Pro-M EFI Boost Control system is, you need to compare the process necessary to set up the boost controls in any one of our competitor's products, to setting it up with Pro-M EFI. We encourage you to read through any and all of our competitors's manuals and watch their videos. To say that they make it difficult would be a major understatement. With their systems, you’re required to perform months of testing just to get it working and then more of the same to enable closed loop control. With the Pro-M EFI system, all you do is tell the system how much boost you want to make and when you want to make it. This is explained in greater detail below.
The following is an overview of the Pro-M EFI Boost Control System. Detailed instructions are provided with your EFI system, or they can be emailed to you upon request.
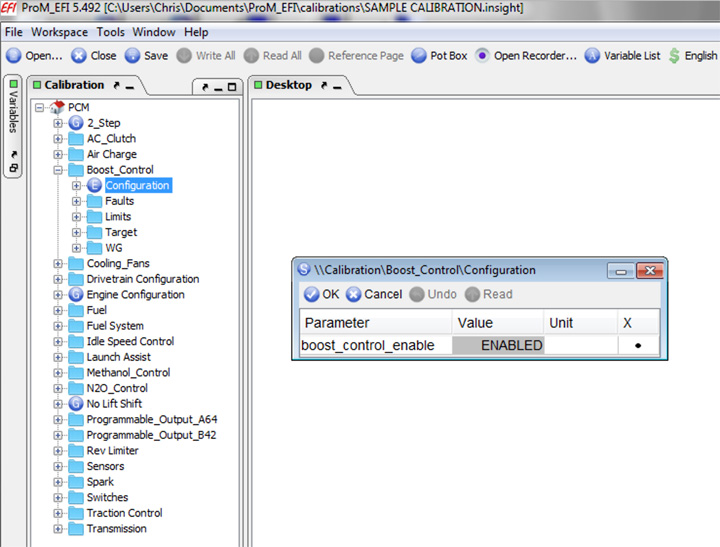
Enable the Boost Control System
In the “Calibrations” area, open the “Boost Control” section, then drag “Configuration” to the desktop. Change “Boost Control Enable” to “Enabled”. This is shown below.
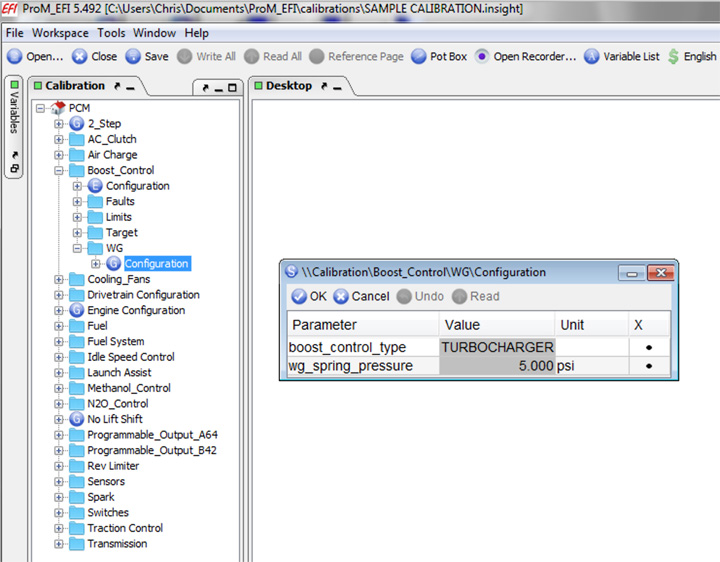
Configure the Boost Control System
In the “Calibrations” area, open the “Boost Control” section, then open the “WG” section, then drag “Configuration” to the desktop. Choose “Turbocharger” or “Supercharger” and enter your wastegate's spring pressure. This is shown below.
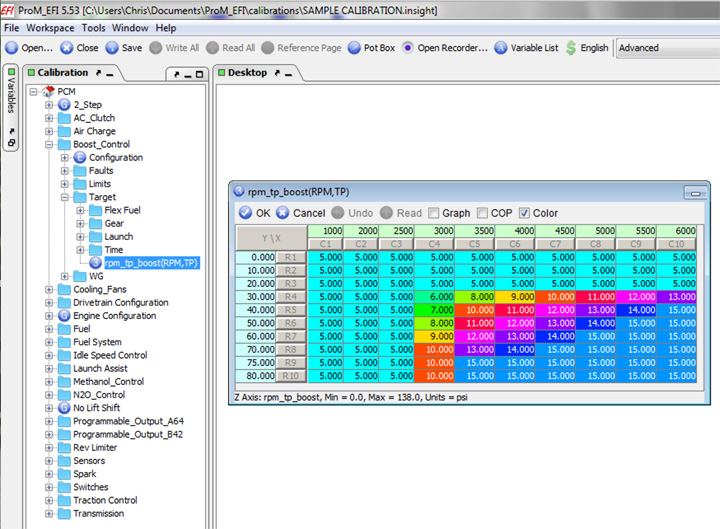
In the “Calibrations” area, in the “Boost Control” section, open the “Target” section, then drag “RPM TP Boost” to the desktop. This is the default way to control boost and is the method that will be used unless you enable one or more of the other methods. Using this table, you can control the boost pressure based on throttle position and RPM. The values on the left represent relative throttle position. The values across the top represent engine RPM. This is a simple and very effective way to control boost pressure. In the example table below, you can see how we have used this table to ramp up the boost as a function of both throttle position and engine RPM. Keep in mind that you cannot command a level of boost that is lower than your wastegate spring pressure, so do not enter values in this table that are a lower value than your spring pressure. The table below is an example of how you might want to configure your table if you had a 5 pound wastegate spring and wanted to make 15 pounds of boost maximum.
Optional Methods for Controlling Boost
Boost control based on Gear
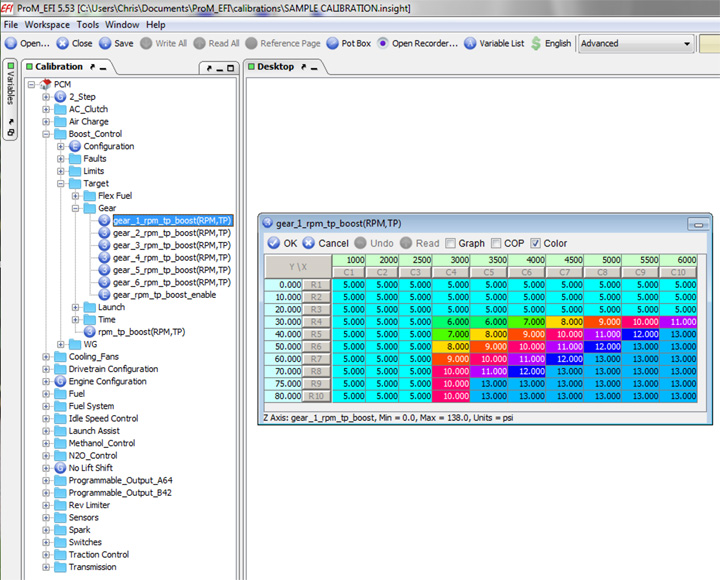
You can control boost pressure based on what gear the transmission is in. Using this method, boost pressure will be determined by throttle position and engine RPM in each gear. The tables for each gear work just like the the base “RPM TP Gear” table, but there is an individual table for each gear.
In the “Calibrations” area, in the “Boost Control” section, in the “Target” section, open the “Gear” section, then drag “RPM TP Boost” for the desired gear to the desktop. When using this method, the values in these tables will override the values in the base “RPM TP Gear” table. Configure each table as desired. Keep in mind that you cannot command a level of boost that is lower than your wastegate spring pressure, so do not enter values in this table that are a lower value than your spring pressure. After you have configured the tables, drag “Gear RPM TP Boost Enable” to the desktop and enable this feature if desired. The table for first gear is shown below.
Boost control based on Time Since Launch
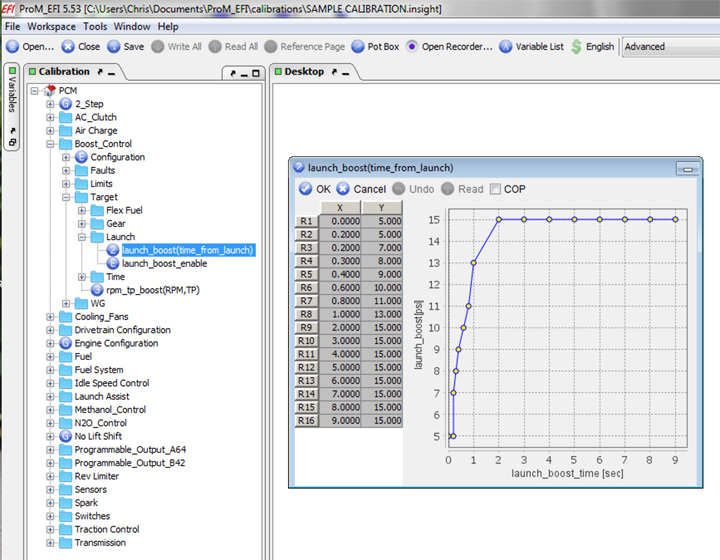
You can control boost pressure based on the elapsed time since 'launch'. This method is activated when you switch off the 2 Step rev limiter. The column on the left is time since launch. The column on the right is boost pressure.
In the “Calibrations” area, in the “Boost Control” section, in the “Target” section, open the “Launch” section, then drag “Launch Boost” to the desktop. Configure the table as desired. Keep in mind that you cannot command a level of boost that is lower than your wastegate spring pressure, so do not enter values in this table that are a lower value than your spring pressure. After you have configured the table, drag “Launch Boost Enable” to the desktop and enable this feature if desired. The “Launch Boost” table is shown below.
Boost control based on time in each gear
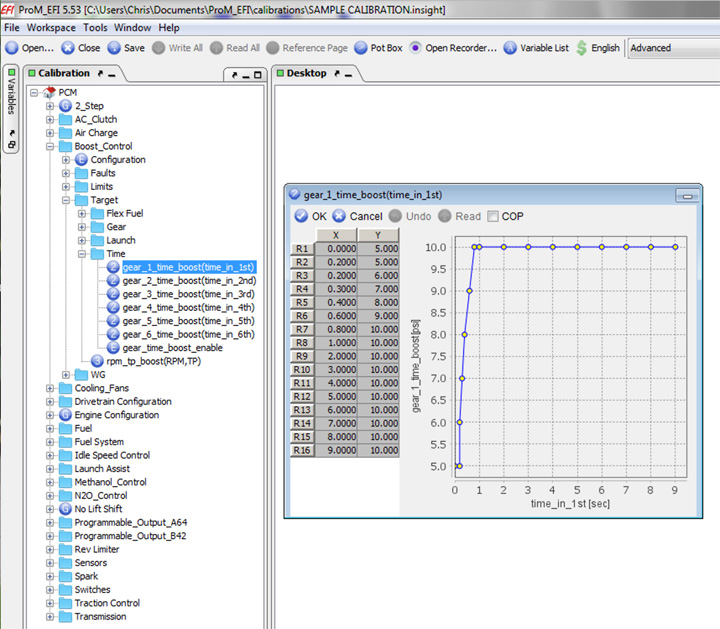
You can control boost pressure based on the elapsed time in each gear. There is an individual table for each gear. The column on the left is time in that particular gear. The column on the right is boost pressure.
In the “Calibrations” area, in the “Boost Control” section, in the “Target” section, open the “Time” section, then drag the table for the desired gear to the desktop. Configure the tables as desired. Keep in mind that you cannot command a level of boost that is lower than your wastegate spring pressure, so do not enter values in this table that are a lower value than your spring pressure. After you have configured the tables, drag “Gear Time Boost Enable” to the desktop and enable this feature if desired. The table for first gear is shown below.
Boost control based on any combination of the methods above
Once you have configured each of the boost control methods described above to your liking, you may enable any combination of them you desire. You can enable all of them at once if you'd like. Note that if the “Gear” method is enabled, the values in these tables will be used and the base “RPM TP Boost” table will be ignored. If the “Gear” method is not enabled, then the values in the base “RPM TP Boost” table are used.
The Pro-M EFI PCM will modulate boost based on the lowest boost level commanded by the selected combination of boost control methods. Assuming you have set up each method to achieve the best possible acceleration, using all of these methods at once will give you the absolute best results possible under all conditions. And when used with our Traction Control system, even if you adjust these values towards he aggressive side, the Traction Control system will keep the tires stuck to the pavement, resulting in the best track times possible.
Boost Adder Based on the Ethanol Content of your Fuel
If using our flex fuel system, you can use the “Flex Fuel Boost Base Adder” table to add whatever amount of boost you'd like based on the ethanol content in your fuel.
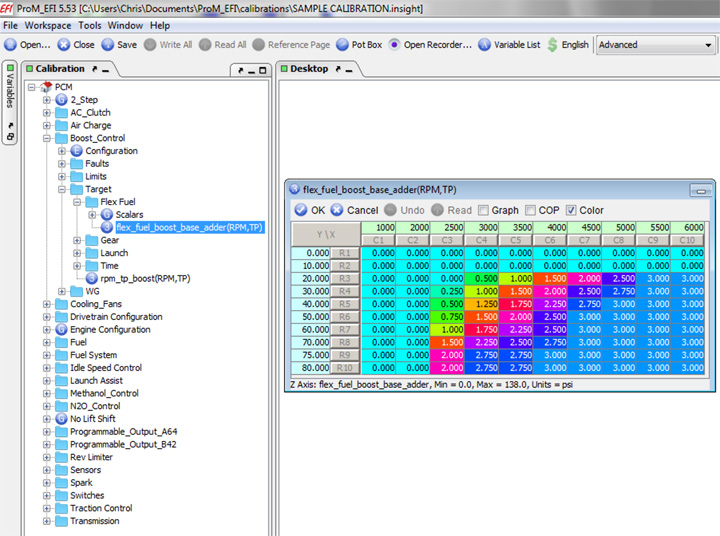
In the “Calibrations” area, in the “Boost Control” section, in the “Target” section, open the “Flex Fuel” section, then drag the “Flex Fuel Boost Base Adder” table to the desktop. The values on the left represent relative throttle position. The values across the top represent RPM. The values in the table represent the amount of boost that will be added. You can add any amount of boost you want, in any area of the table you want. The values in this table will be multiplied by the ethanol content of your fuel, so there is no need to constantly adjust this table. For example, if your fuel contains 50% ethanol, then 50% of the values in this table would be added to the desired boost pressure. Please note that this adder only applies to the "RPM TP Boost" table and to the "Gear" tables. Also, if using the "Gear" boost option, the adjusted value will be again multiplied by the "Flex Fuel Boost Gear" multiplier for each individual gear, allowing you to completely customize how much boost you want to add and where you want to add it. This is explained further on the next page. Please note that no boost is added below 11% ethanol, since most pump gas already contains 10% ethanol. An example of how you might configure the Flex Fuel Boost Base Adder table is shown below.
Next, in the “Calibrations” area, in the “Boost Control” section, in the “Target” section, in the “Flex Fuel” section, drag the “Scalars” section to the desktop.
Change the “Flex Fuel Boost Adder Enable” parameter to “Enabled” to activate the ethanol content boost adder feature.
The remaining six parameters are multipliers to the boost adder for each gear. A value of “0” would mean you would get none of the adder in that gear. A value of “.5” would mean you would get half of the adder. A value of “1” would mean you would get all of the adder for that gear. This allows you to add extra boost, without necessarily adding it in all gears, which will help keep the tires stuck to the pavement. For instance, using the example values shown below, if the Flex Fuel Boost Base Adder table was to add 4 pounds of boost, you'd get no added boost in first gear, 1 pound additional boost in second gear, 2 pounds additional boost in third gear and 4 pounds in the remaining gears.
The “Scalars” section is shown below.

Boost Limiters
Boost limiter based on air intake temperature
You can “clip” the amount of boost allowed based on air intake temperature.
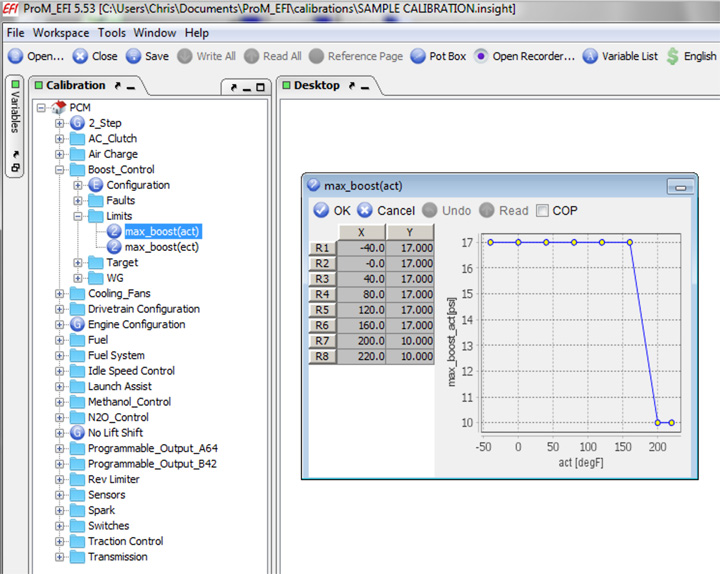
In the “Calibrations” area, in the “Boost Control” section, in the “Limits” section, drag “Max Boost ACT” to the desktop. The column on the left is Air Intake Temperature. The column on the right is the boost limit. Configure the table as desired. The boost commanded will be “clipped” by these values, regardless of what boost pressure is being commended by the selected boost control method(s). The Max Boost ACT table is shown below.
Boost limiter based on engine coolant temperature
You can “clip” the amount of boost allowed based on engine coolant temperature.
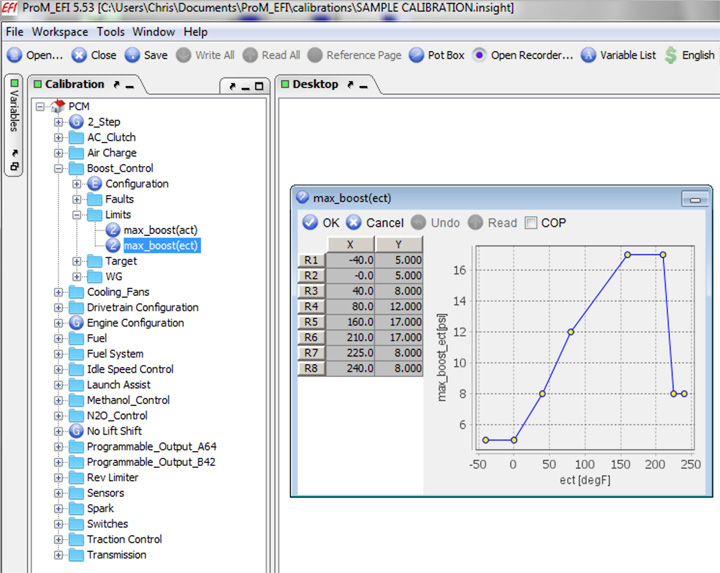
In the “Calibrations” area, in the “Boost Control” section, in the “Limits” section, drag “Max Boost ECT” to the desktop. The column on the left is Engine Coolant Temperature. The column on the right is the boost limit. Configure the table as desired. The boost commanded will be “clipped” by these values, regardless of what boost pressure is being commended by the selected boost control method(s). The Max Boost ECT table is shown below.
PRO_M EFI How-To Videos